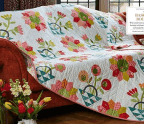
SOFTLY FALLING SNOW

You will need
• White fabric – 5yds
• Aqua/light blue fabric – Four (4) fat quarters or 1yd
• Pale grey prints – Five (5) fat quarters or 1yd
• Mauve/mid-grey prints – Three (3) fat quarters or ½yd
• Dark grey prints – Two (2) fat quarters or ⅓yd
• Charcoal prints – Three (3) fat quarters
• Red prints – Two (2) fat quarters
• Holly green prints – Two (2) fat quarters
• Paper for tracing or printing foundations – Minimum sixty-three (63) sheets
• Fabric or washable glue
• Postcard or similar
• Add-a-Quarter (or small rotary cutting ruler)
• Stabiliser or fusible web – 2¾yds
• Batting – 80in x 73in
• Fabric for backing – 4›/›yds
• Fabric for binding – ¾yd
• Teflon Pressing sheet/baking tray liner
Finished size
■ Approx. 70in x 65in or 74in x 65in if adding spacers, see Step 63
Notes
■ *Use leftovers for any pieces you can’t get from the listed strips.
Cutting out
■ Cut pieces in the order listed and cut half-strips (approximately 20in to 21in), if using yardage, from the longest edge.
■ Because the Snowflake blocks are made with foundation piecing, all the pieces are cut oversized, so don’t be too concerned if they are a bit inaccurate; the excess will be trimmed off as you piece the block.
■ Fi prefers using larger prints for the larger pieces so you can appreciate the print motifs, so she has listed which blocks each cut is for, to help you choose fabrics.
■ Each Snowflake block is made from six (6) segments plus four (4) background corners. Since snowflakes are all about radial symmetry, Fi suggests using the same print for each of the matching patches in the six (6) segments (although you can always play with a scrappier approach if you prefer).
■ Make sure you are cutting all angles at 60º not 45º!
1 From your white fabric, cut a 65½in length. With the fabric folded (as it comes off the bolt) measure 65½in along the selvage. Fold the remainder back bringing the folded edges (as it comes off the bolt) together, cut along the perpendicular fold at the 65½in length. Set aside the remaining fabric for step 2. Open out, then refold the cut length so that the selvedges are at both edges; fold twice to make four (4) layers. The folded fabric should be around 44in x 16¼in. Trim off the first selvedge to give a straight edge. From this edge, cut the following:
■ Two (2) 12½in x 65½in strips for the alternate plain strips.
■ Two (2) 5½in x 65½in strips for the vertical borders.
2 From the remaining white fabric, cut as follows:
■ Four (4) 5½in x WOF strips for the horizontal borders.
■ Five (5) 4in x WOF strips, subcut into thirty (30) 4in x 7in rectangles for the corner triangles.
■ One (1) 3in x WOF strip, subcut into twelve (12) 3in diamonds for Block C.
■ Four (4) 3in x WOF strips, subcut into one-hundred-and-eight (108) 3in equilateral triangles for Blocks A, B and D*.
■ Three (3) 2in x WOF strips, subcut into ninety-six (96) 2in equilateral triangles for Blocks A, B and